Adding Admins to Your Valheim Server
This article will guide you through the process of adding admins to your Valheim server.
Adding Admins
Find their Steam64 ID number
First, you must find the player ID of the player you want to grant admin. These are in the common Steam64ID format, and there are a few places where you can easily find this.
The one we recommend the most is using a tool such as SteamID.net to look up and find these Steam64IDs.
Another will be in your server's Console - when a player joins the server, you will see two lines that will provide their ID.

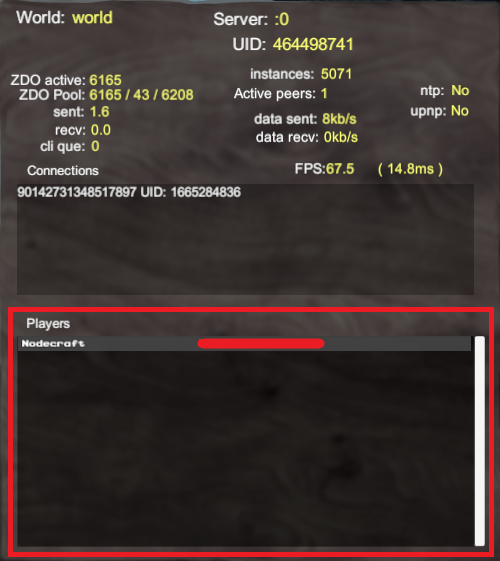
You can also get their ID in-game by pressing the F2 key on your keyboard. In the lower section "Players", you will see their in-game name and their player ID, which we have crossed out in the screenshot.
Adding to the adminlist.txt file
Now you need to add that number to the adminlist.txt file located in /.config/unity3d/IronGate/Valheim in the Server Files" section in Nodecraft Pro.


Don't forget to Save your changes, and then Restart your server.
Add the -console Argument to Your Client
To use the admin menu in-game, you'll need to add a startup argument to your client.
In your Steam Library, right-click on Valheim, and select Properties.
Then in the General tab, enter -console into the Launch Options field and then close it.
 Be sure to Restart your game client if you haven't already.
Admin Commands
Now you'll be able to use commands in-game! To bring up the in-game console, press the F5 key on your keyboard.
While not all the commands can be used, here are some useful ones:
| Command | Description |
|---|---|
| help | Lists all the commands you can use |
| kick [name/ip/userID] | Kick the user |
| ban [name/ip/userID] | Ban the user |
| unban [ip/userID] | Unban the user |
| banned | Shows a list of banned users |
| ping | Send a ping to the server to get your latency |
| save | Issues a world save |
Need Help?
If you have questions or run into any issues, our support team is here to help! Reach out using the support widget on our website or visit our support center for further assistance.