Creating a "server.cfg" file for your Arma 3 Server
Arma 3 does not provide a server.cfg by default. If you want to change the configuration of your Arma 3 server, you will need to create a file manually, and then set a startup parameter on the server control panel to load that file on startup.
Naming the Configuration File
By default, the Nodepanel will automatically look for a file called server.cfg, so for sake of brevity we recommend naming the file to this.
However, you don't need to name the file server.cfg. The name of the file can literally be anything.
Since you tell the game exactly which file to look for and load using a startup parameter for the game, you can actually name the config file whatever you want. This allows you to have more than one config file, and quickly switch between them simply by changing the parameter on each startup. You can have a config file tailored to a specific mission, a whole series of missions, configs for training missions, for serious gameplay, etc.
You should avoid spaces in the file name, so use things like underscores if you want multiple "words" for the file name, such as the following:
for_example_like_thisContent of the Config File
We recommend reading through our article Configuring your Arma 3 Nodecraft Server for an example server.cfg as well as information on other settings.
If you want to include comments in the config file, put double slashes at the start of the line (//) and everything beyond the double slashes will be skipped by the game. Leaving notes is always a good thing, in case you forget why a specific setting is in the file. You could also use the comments to list specific missions the config file is intended to be used with, and other things.
Activating the Config File
As mentioned earlier, by default the Nodepanel will automatically load server.cfg automatically as -config=server.cfg has been added as a startup parameter
You can customize your own startup parameters by clicking on the Game Settings page of your Nodepanel. You will see a white box labelled "Params:"
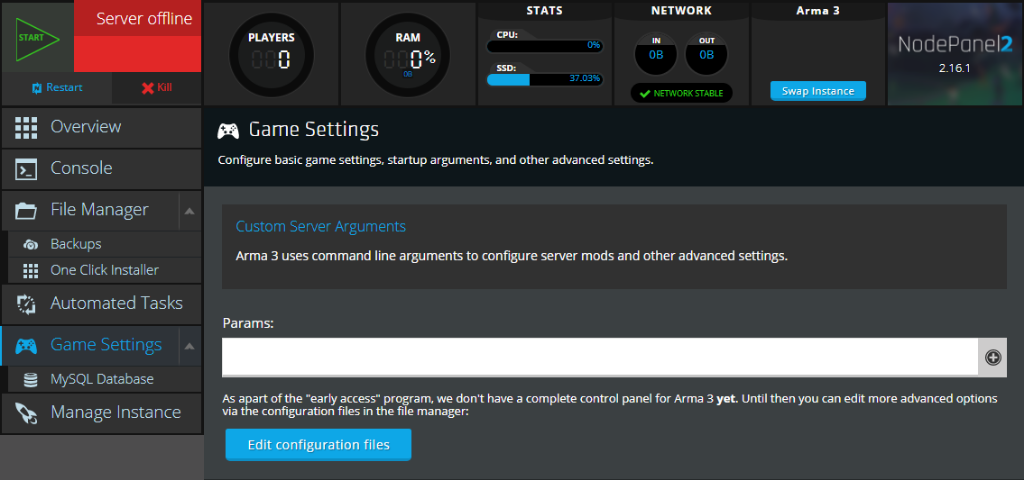
In the box, enter the command:
-config=(filename)
Then click the "Save" button. If you have more than one startup parameter, each should be added to it's own "params" box. Click the plus sign in a circle at the right end of the box to add more boxes for parameters.
Need Help?
If you have questions or run into any issues, our support team is here to help! Reach out using the support widget on our website or visit our support center for further assistance.