Adding Missions to your Arma 3 Server
Custom missions or scenarios provide an ever-expanding gameplay experience for Arma 3 players. Scenarios from the Steam Workshop can be quickly added to your Nodecraft Arma 3 instance following the steps in this article.
Find the .pbo Mission File
In order to locate your mission's .pbo file, you'll need to start the mission in Singleplayer. Once the mission begins and finishes loading into the top-down map, you can quit Singleplayer.
Your Saved data for Arma 3 will be located at one of these file locations.
| Windows | Linux |
|---|---|
| C:\Users\%UserName%\Documents\Arma 3 - Other Profiles\%ProfileName%\Saved\steam | /usr/home/arma-server/player/saved/steam |
| C:\Users\%UserName%\Documents\Arma 3\%ProfileName%\Saved\steam | /usr/home/arma-server/server/saved/steam |
In most cases the Profile Name will be what you have set the -name parameter too. Once that is located open your desired mission folder.
Upload the .pbo File to your Server
Upload any mission files to the mpmissions folder in the main directory of your File Manager.

Editing the server.cfg File
We have a separate article in our Knowledgebase about Creating a server.cfg file for your Arma 3 Server. This config file does not normally exist at start up, and you must create one manually.
In the server.cfg file, look for the following section if it already exists, or add it if it does not.
class Missions {};Expand the brackets, like this
class Missions {


};
and then for each mission, include the follow block of text, between the brackets.
class Missions
{
	class TestMission01
	{
		template = MP_Marksmen_01.Altis;
		difficulty = "veteran";
		class Params {};
	};
};
Of course, that's just a stock example.
On the template= line, change the following text to be the name of the actual mission file.
Note: a mission file might end in .pbo, but it's not necessary to include the .pbo part of the filename in this config file. For example, that sample mission shown above would have been named MP_Marksmen_01.Altis.pbo in full. Only the MP_Marksmen_01.Altis part of the file name needs to be set in this config file.
Adding multiple missions to the config is as simple as including more blocks, one after another to this section of the config file, like the example below. Make sure you don't clip off that last trailing closing bracket/semi-colon, which is for the entire "class" block as a whole.
class Missions
{
	class TestMission01
	{
		template = MP_Marksmen_01.Altis;
		difficulty = "veteran";
		class Params {};
	};
	class TestMission02
	{
		template = MP_End_Game_01.Altis;
		difficulty = "veteran";
		class Params {};
	};
	class TestMission03
	{
		template = OPTRE%3a%20Desperate%20Measures.Altis;
		difficulty = "veteran";
		class Params {};
	};
	class TestMission04
	{
		template = OPTRE%3a%20Helljumpers.Malden;
		difficulty = "veteran";
		class Params {};
	};
};
Activating the Config File
By default, the Nodepanel automatically adds the Startup Parameter -config=server.cfg. Thus, by creating a file with this name, it will automatically be used when the server starts up.
Otherwise you can enter your own startup parameters to specify another name by clicking on the Game Settings page of your Nodepanel. You will see a white box labelled "Params:"
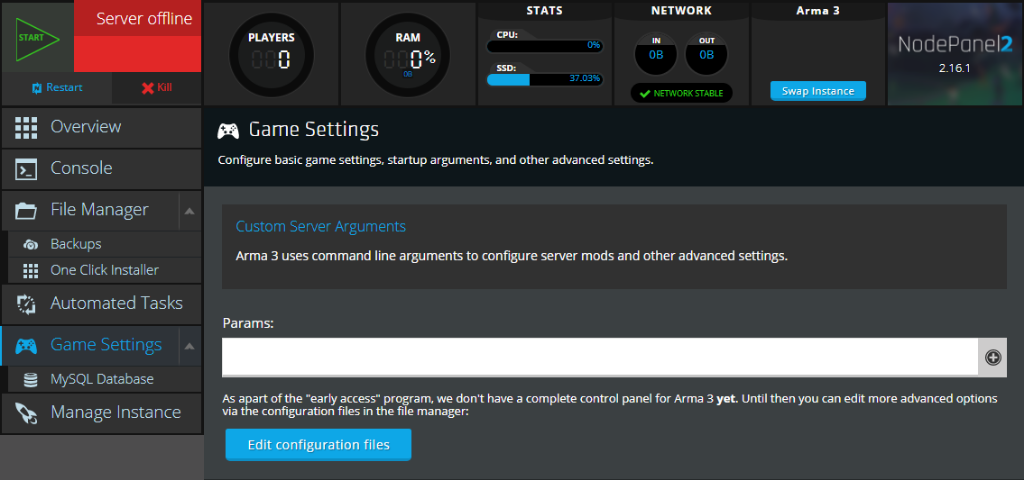 In the box, enter the command:
-config=(filename)
Then click the "Save" button. If you have more then one startup parameter, each should be added to it's own "params" box. Click the plus sign in a circle at the right end of the box to add more boxes for parameters.
Multiple Config Files
Arma 3 allows multiple server.cfg files to be used, and you can switch between configs by changing a startup parameter each time the server is restarted. Because of this, you can upload many missions to the server, and control which if any of them are actually loaded by changing the config file used at startup.
Need Help?
If you have questions or run into any issues, our support team is here to help! Reach out using the support widget on our website or visit our support center for further assistance.