How to Set Up Geyser and Floodgate for Minecraft Crossplay
Geyser and Floodgate are two mods/plugins that work together to make it possible to join a Minecraft Java Edition server with a Bedrock client. This allows for crossplay between the two different versions of Minecraft. In this article you will learn how to install, update, and configure your Geyser server!
Setup and Plugin Installation
Note: We recommend to fully stop your Minecraft server before making any edits or config changes.
To get started, you need to install a supported server platform for Geyser and Floodgate. The following platforms are currently supported: BungeeCord, Fabric, NeoForge, Spigot, Paper, Velocity, ViaProxy. For this tutorial, we will be using Paper as the server platform.
Install your desired server platform using the One Click Installer or one of the download links from above.
Download the
.jarfiles for Geyser and Floodgate that match your chosen Minecraft version.Upload them to your server’s
pluginsfolder located in the Server Files.Note: If you are using Fabric or Neoforge, put the jar file into the
modsfolder instead.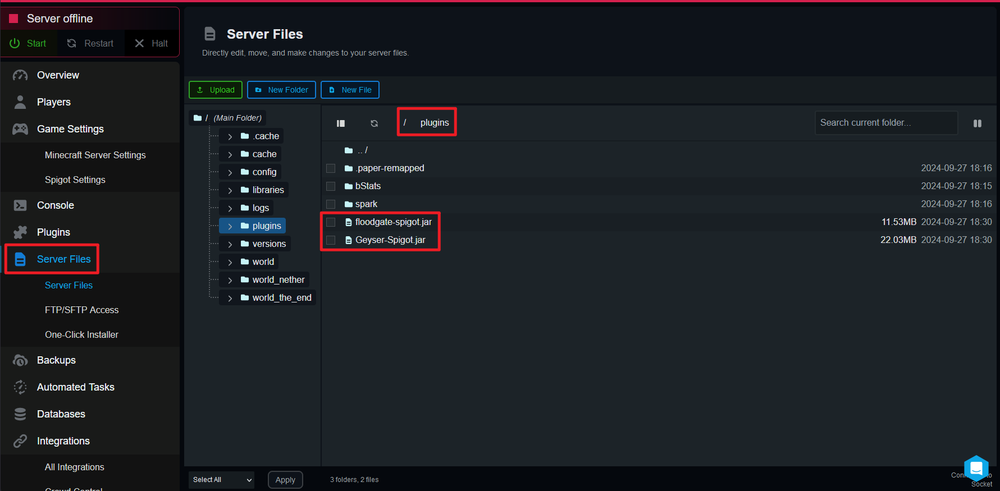
Restart the server for the plugin to take effect and generate the neccessary configuration files.
Depending on where you are hosting your server, you’ll also need port 19132 to be open. If running a Nodecraft server, this should already be open for you.
Changing the Settings for Floodgate
Floodgate is an optional plugin that integrates with Geyser, allowing Minecraft Bedrock players to join without needing a separate Java Edition account. It also enables allowlist functionality and custom player skins for Bedrock users.
Go to the Geyser
config.yml. This file will be in/plugins/Geyser-Spigot.
Change the line
auth-type: onlinetoauth-type: floodgate
Changing Optional Geyser Settings
There are several customizable settings within Geyser’s configuration that can enhance the quality of life for players on your Minecraft server. Below are some commonly adjusted settings:
You can change the port if you would like. However, you’ll need to verify that the UDP port for the port listed is open depending on how you are hosting your server (See list of supported hosts here). Additionally, the default for Bedrock clients to connect to is 19132 as listed by default in the config.
motd1andmotd2are settings for if you want your Message of the Day (motd) to show differently in Bedrock and Java.server-namecan be changed to display a custom name on Bedrock Edition when players see and connect to your server.passthrough-motdcan be used to copy the motd that is set in your game settings to Bedrock Edition if you don’t want to have a separate motd for Bedrock.allow-third-party-capesallows the capes from third party mods such as Optifine, LabyMod etc. to be shown.show-cooldownallows the cooldown for weapon attack speeds to be displayed on Bedrock Edition.emote-offhand-workaroundallows Bedrock players to put any item in their offhand like Java can by using emotes. There are 3 options for this. By default, it isdisabledmeaning the workaround isn’t applied. Theno-emotesoption prevents the emote from being seen by other Bedrock clients and swaps the item in the offhand. Theemotes-and-offhandoption allows the emote animation to be seen by other Bedrock users and swaps the item in the offhand.above-bedrock-nether-buildingallows Bedrock Edition players to see above the Nether’s ceiling and build on it which it does not normally allow. It does this by changing the ID of the world which can cause the per-biome fog to be displayed incorrectly.Adding Bedrock Players to the Allowlist Using Floodgate
Adding Bedrock Players to the Allowlist Using Floodgate
If you want to use an allowlist on your server, you can use Floodgate to add Bedrock players.
Use
/fwhitelist add UserNameor/fwhitelist add floodgateUUIDto add Bedrock Edition players to the allowlist.Java Edition players should still be added using the default
/whitelistcommand.
Additionally, do not include the prefix set in the floodgate config when entering the username to the allowlist.
Getting a FloodgateUUID
In some cases, if the system doesn’t pick up on the username, you’ll need to use the floodgateUUID to add the player to the allowlist. The floodgateUUID is derived from the XUID and in a specific format so that the Java Edition can read it. The format is 00000000-0000-0000-xxxx-xxxxxxxxxxxx.
Get the players XUID. You can use a tool such as Cakes XUID Grabber to do this.
Take the hex value and replace the x characters in the format mentioned with the hex value.
For example, if the hex XUID was
1234567890123456, thefloodgateUUIDwould be00000000-0000-0000-1234-567890123456
Checking for Updates
Geyser and Floodgate do not include their version in the file download, so you will need to use commands to check the installed version. You can check for updates to Geyser or Floodgate using the following commands in the Console or in-game as a server operator.
/geyser versionShows the current Geyser version and checks for updates./floodgate versionShows the current Floodgate version and checks for updates.
Conclusion
By following this guide, you can learn to set up, configure, and update your server for optimal crossplay functionality. If you encounter any issues, make sure to review the configuration settings and check for updates regularly to ensure smooth gameplay for all players.
The Nodecraft Customer Support team is always standing by if you need assistance!
Need Help?
If you have questions or run into any issues, our support team is here to help! Reach out using the support widget on our website or visit our support center for further assistance.