How to Install and Configure Velocity with Paper
Velocity is a high-performance Minecraft proxy, similar to Bungeecord, that allows you to link multiple Minecraft servers together, enabling players to move seamlessly between them. This guide will walk you through the steps to manually install Velocity jar file and setup your sub-servers using Paper as your Minecraft server software, including the necessary configuration changes in the paper-global.yml file.
Before we start, ensure you have the following:
Access to your Nodecraft control panel.
At least three Minecraft servers available that you want to link together.
Download the Velocity Jar File
1. Visit the Download Page
Go to the Velocity Website or its GitHub Releases page and download the latest version of the Velocity jar file to your computer.
2. Upload the Jar File
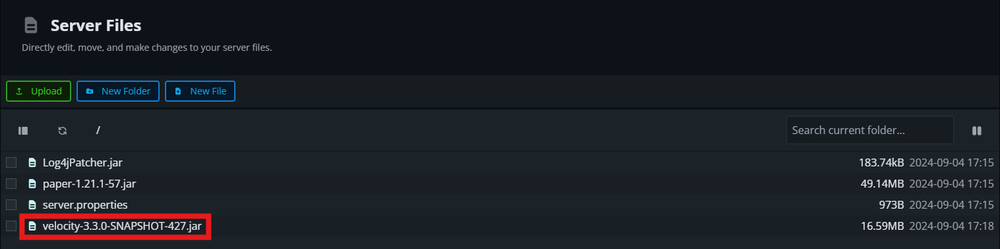
Access your Nodecraft control panel.
Navigate to the Server Files section of the control panel.
Upload the downloaded Velocity jar file to the root directory of the server you want to use as the Velocity proxy server.
Configure the Proxy Server
1. Set the Server Type
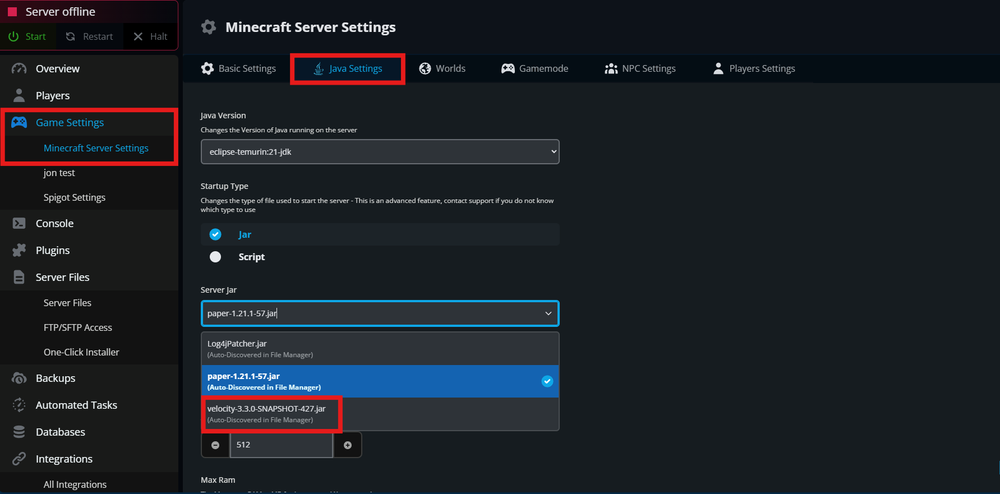
Go to the Game Settings page in your Nodecraft panel.
Under the Java Settings tab, find the Jar dropdown menu.
Select the Velocity jar file from the list.
2. Start the Velocity Server
Navigate to the Console tab in your Nodecraft panel.
Start your server. You should see Velocity starting up in the console.
Configure the Velocity Config File
1. Locate the Config File
After the first startup, Velocity will generate a
velocity.tomlfile in the root directory.Navigate to the Server Files and open the
velocity.tomlfile for editing.
2. Edit the Configuration
In the
velocity.tomlfile, configure the servers to which Velocity will connect. The essential sections are:
[servers]
hub = "localhost:25565"
survival = "localhost:25566"
Replace
localhost:25565with the actual IP address and port of your other Minecraft servers. For example, if your hub server runs on port25565and your survival server runs on port25566, enter those details accordingly.If your sub-servers are hosted on different machines, replace
localhostwith the Minecraft server's public IP or hostname.Remove any hosts from the
forced-hostssection of the config unless you plan to have custom host domains.
3. Change the Bind Port if Needed
Locate the
bindsetting in thevelocity.tomlfile:
bind = "0.0.0.0:25577"Change the
25577part to match the port where your Velocity proxy should listen. For example, if you want Velocity to run on port25565, set it as0.0.0.0:25565.
4. Set the Forwarding Mode
Locate the
player-info-forwarding-modeand configure it as follows:
player-info-forwarding-mode = "MODERN"5. Save the Configuration
After making your changes, save the
velocity.tomlfile.
Setting Up The Secret Key
You will need to create/generate a secret key/phrase to ensure the connection between the servers and Velocity is secure. By default, this file is forwarding.secret unless it was changed in the velocity.toml. In this file, you will want to just put either a random password or phrase to ensure no one else can gain access to it!
Setting Up Your Sub-Servers
To ensure that your other Minecraft servers work correctly with Velocity, you need to configure the paper-global.yml file.
1. Locate and Edit paper-global.yml
On each sub-server, go to the Server Files and navigate to the
configdirectory.Open the
paper-global.ymlfile for editing.
2. Enable Velocity Support
Find the
velocitysection in thepaper-global.ymlconfiguration file and configure it as follows:
velocity:
  enabled: true
  online-mode: true
  secret: "your-secret-key-here"
Ensure that the
secretkey matches exactly with theforwarding.secretset on the Velocity side!
3. Configure server.properties
Still, on each sub-server, locate and edit the
server.propertiesconfiguration file.Set the server's
online-modetofalse:
online-mode = falseThis prevents conflicts with Velocity's online mode setting and allows players to authenticate properly through the Minecraft proxy.
4. Restart All Servers
After making these changes, restart all of your Minecraft servers and the Velocity proxy server.
Testing Your Setup
Connect to the Proxy:
Launch Minecraft and add your Velocity proxy server's IP address to the multiplayer server list.
Connect to the proxy server.
Switch Between Servers:
Use the
/servercommand followed by the server's name (e.g.,/server survival) to switch between the linked sub-servers.Ensure that you can move between the Minecraft servers seamlessly.
Troubleshooting Tips
If you can't connect to a sub-server: Double-check the IP address and port settings in the
velocity.tomland ensure the secret keys match across the configurations.If player data isn't transferring correctly: Ensure that
forward-player-ipsis set totruein Velocity'svelocity.toml, andvelocityis enabled in the Paper server'spaper-global.yml.
By following these steps, you should have a fully functional Velocity proxy setup, linking your Paper Minecraft Java servers together!